
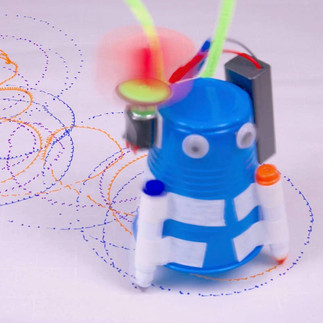
DIY Scribbling Doodle Bot Project - STEM Classic Made Better
- Lance Akiyama

- Oct 18, 2021
- 5 min read
Updated: Oct 9, 2025

Scribbling doodle bots are an iconic kids' STEM activity and often the first "robot" that they'll build. It's easy to create a design that's exciting and successful, yet challenging enough to keep kids engaged.
To get the most out of this classic project make sure your activity plan includes these 3 things:
Electronics that are easy for kids to assemble independently.
Materials that are durable and can be reattached in different configurations.
Make it easy for kids to test, redesign, and reflect to achieve ever-better scribble patterns.
I'll explain why some materials work better than others for this activity, and I'll highlight the best ways the scribble bot can be modified to change the drawing pattern.
Supplies

We made a kit of carefully tested supplies for 10 robots, but you can source the components yourself too! Here are the best materials for making a doodle bot:
For the paper I recommend using newsprint or packing paper. These sheets are large and inexpensive.
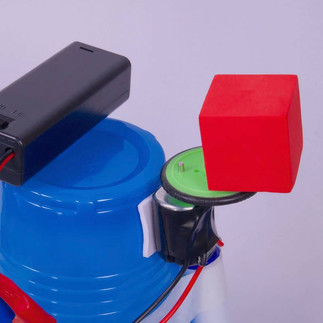
3V DC electric motor - Smaller motors with flat-sided housing work best for this activity. They're low powered which tends to create more contiguous scribbling lines.
Higher powered motors cause the robot to bounce off of the paper, which more often creates dot patterns that I think are less satisfying, plus it would draw more power from the battery.
Additionally, the flat sides are a great attachment surface for the adhesive squares.
1 AA battery holder with switch - A single AA battery holder is cheaper and it creates a weaker vibration force which produces better drawing patterns. Including the switch on the holder simplifies the circuitry for younger kids.
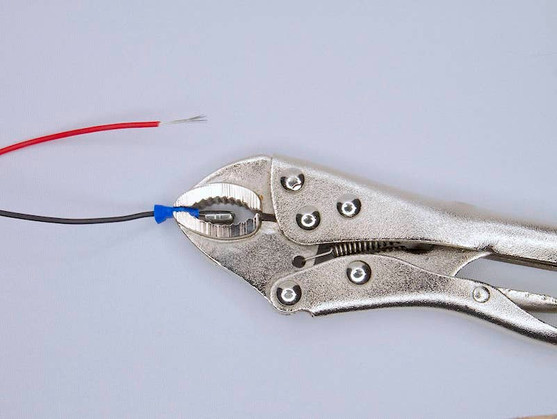
Plug connectors - Also called bullet connectors, these will make it easy for kids to assemble their circuits and reverse the electrical current. You'll need a crimping tool or a pair of vice grips to use these.
12oz plastic cup - Plastic cups are better than paper because the adhesives can be removed and reused without tearing off the paper coating. Be sure to get cups that are conical-shaped. Cylinder-shaped vessels are less stable.
Plastic wheels/pulleys - These are easy to fit onto the motor and won't fly off. They also provide a large flat surface that an off-center weight can be attached to.
1in adhesive squares - These are for attaching the motor and battery holder; they work better than tape. With tape, the motor can wiggle itself loose and less vibrational energy is transferred into the robot. Adhesive squares ensure most of the vibrations are transmitted to the marker tips.
1in foam cubes - This is the off-center weight. Foam cubes provide sufficient weight but if they happen to get flung off they won't hurt anyone!
Stubby markers - Longer markers are more difficult to attach securely and it raises the robot's center of mass, which makes it less stable. Thick, cone-shaped marker tips are more durable than skinny pen-tip markers.
Masking tape - Easier to work with than duct tape and stronger adhesive than clear tape.
Pipe cleaners - For fun :)
And most essential of all: wiggly eyes
Step 1: Prep the Electronics


Our scribble bot kit comes with pre-prepped wires. Otherwise this step can be time-consuming, but think of it this way: You're exchanging your time prepping so kids can have more time to experiment and play with their scribble bot. Additionally the plug connectors make it easy for kids to switch the motor direction, which is another variable that changes the scribble pattern.
Begin prepping by cutting the wire to just ≈3'' (8cm). Short wires are less likely to get caught up in the spinning motor.
Strip off 1'' (2.5cm) of insulation. Make sure the wire strands are straight and flat. Insert it into the plug connector, then crimp it tightly. Tug on the connector to make sure it's firmly clamped onto the wire.
IMPORTANT: Make sure the hooded socket connectors are used for the battery holder! This prevents the wires from coming into contact with each other and forming a dangerous short circuit.
Bonus step: Shrink wrap the motor wires or wrap them in electrical tape. If your motor wires break off easily or you plan on reusing these components with multiple groups of kids I recommend getting 1'' (2.5cm) heat shrink tubing, cutting it into segments, and shrink wrap the motor wires agains the metal housing (picture 3). This prevents the wire terminals from bending back and forth and eventually breaking off.
Step 2: Assemble the Electronics


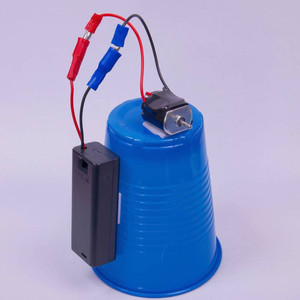
From here assembling the circuit is easy, just plug the connectors together! To change the direction the motor spins, switch the wires around.
Next, attach the electronics to the cup with the adhesive squares. Press firmly for a stronger bond! The only requirement is that the motor shaft pokes out over an edge of the cup so there's room for the off-center weight to spin.
Step 3: Add an Off-center Weight

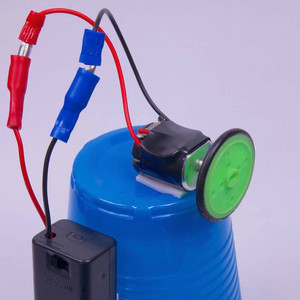


Fit the plastic wheel onto the motor hub. The center hole and some of the other holes fit snugly, some fit loosely. The loose fit is designed for other projects, but for the scribble bot make sure to use a snug-fitting hole.
Use an adhesive square to attach the foam cube onto the wheel. Make sure the cube is at least a little bit off-center so the robot vibrates when the wheel and cube spin.
Step 4: Tape on the Markers


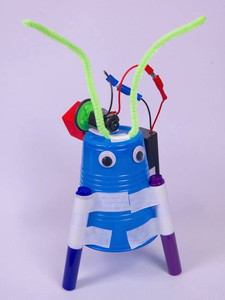
Use at least two long pieces of tape per marker and make sure the felt tip will touch the paper when the caps are removed. And of course give your robot some personality with wiggly eyes, pipe cleaners, a silly name and anything else!
Step 5: Test and Experiment!


There are several ways kids can experiment with the scribble bot design to produce different drawing patterns:
Switch the circuit polarity: Disconnect the wires and reconnect them the other way around to change the direction of the electrical current, which will make the motor spin in the opposite direction. This changes how the off-center mass moves, which can affect things like how quickly the bot is spinning.
Change the position of the electronics: The electronics are relatively heavy, so detaching them and reattaching them to different parts of the robot significantly changes the center of mass. Making the center of mass higher, lower, more to one side, or balanced will change the drawing pattern because it changes how the weight is distributed on the markers.
Change the position of the motor: Moving the motor to different parts of the robot changes where the vibrational energy comes from, which changes how that energy gets transmitted throughout the rest of the robot.
Try different foam cube positions: Moving the foam cube closer to the center of the wheel increases the vibration frequency but lowers the intensity, and vice versa.
Adjust the angle of the markers: Instead of taping the markers straight up and down, try taping them at an angle. This has a big effect on how fast the robot moves around the paper and how much it spins or goes in a straight path.
Step 6: Finalize the Markers

Once you've tested and experimented with many different variations and you've found one that produces your favorite drawing patterns, finalize the position of the markers by adding on two more overlapping pieces of masking tape. This secures the first two pieces of tape and helps the markers stay in position. You can also use extra adhesive squares or a stronger tape to further secure the markers.
The scribble bot will live on for a few days until humidity and the weight of the components causes the pieces to fall off. Fortunately the adhesive squares can usually be reused for a couple of weeks before needing to be replaced so it's easy to repair broken bots.
Besides drawing scribbly patterns, these robots can be used in other fun ways too! For example, use the vibrating motor circuit to create a jittering junk bot that bounces its way down a cardboard ramp. Keep finding new and inventive ways to either improve the scribble bot or repurpose the parts into something totally new!


This Call Girl Service in Aerocity provides a lavish and indulgent experience. From her sophisticated presence to our engaging conversation, every aspect exceeded my expectations.
Coursework can easily become too much for students struggling several classes, part-time jobs, or family pressures. By matching students with professionals who can help in a variety of areas, such as math, physics, literature, and more, “coursework help" services provide a useful alternative. Even during extremely hectic or difficult semesters, students are able to achieve deadlines and keep good scores thanks to this support. Students who require assistance with particular subjects or assignment types—from essays and research papers to problem sets and presentations—benefit from these offerings. Students who receive expert help produce excellent, thoroughly researched, and precisely formatted homework that meets their academic standards. Furthermore, examining finished projects from professionals can be a useful teaching tool that aids pupils in…
yuiyuihiujhuj
Your blog has become my go-to resource whenever I need information on online essay writers. Your expertise shines through in every post, and I'm grateful for the valuable insights you provide. Thank you for being a trusted source of knowledge.
Thanks for sharing us for these information blog . If you want to a precious gifts for anyone so click here
visit my website: 39th birthday ideas